
News: Alright, thanks for your patience! The API got all screwed up 'cause of this major update, buuuut... I got all your goodies now. We got all the daily and weekly shit updated, as well as Spider's Korner.
We got a week until Black Armory and a new season of Crucible/Gambit/Strikes has started. I'll be working my way toward Mountain Top, hbu?
How to get Whisper of the Worm
 Alright, so here we go. The guide that I have been dreading. This guide is gonna require some really abstract descriptions as the actual things you gotta do is pretty simple:
- Wait for the Weekend
- Wait on Io for an Event to Spawn
- Kill a Major
- Jump in the Portal
- Finish Hard Mode Lost Sector in 20 Minutes
And you’re done. But it isn’t as easy as that fambam, this shit gets rough. Especially if you aren’t top tier.
So you want to get that whacky-zany Taken Sniper that can one shot Guardians and is still one of the best boss burn weapons in the game? Well, you’re in for a ride. Getting this weapon requires more patience than anything, and the catalyst is a mess too. First things first, you can only get this on the weekend: Friday through Monday.
Step 1: The Waiting
Once you are Ready for the Weekend, log in get a group of 3 people and travel to the Lost Oasis landing zone on Io. There are only two events that spawn here, and they spawn every 20-30 minutes. You are waiting for the “Taken Blight” event. Unfortunately for you, the main event that spawns here is the Cabal Mining Laser. So chill out here, and familiarize yourself with the area.
Step 2: Kill The Major
When the Taken Blight event spawns, you don’t give a damn about it. What you really care about is the exclusive major that spawns with the event. The most common Boss that will spawn is Kurzon, Aspect of Fate. Below I will put a map with the 3 general areas that each of the Bosses can spawn as well as the portal.
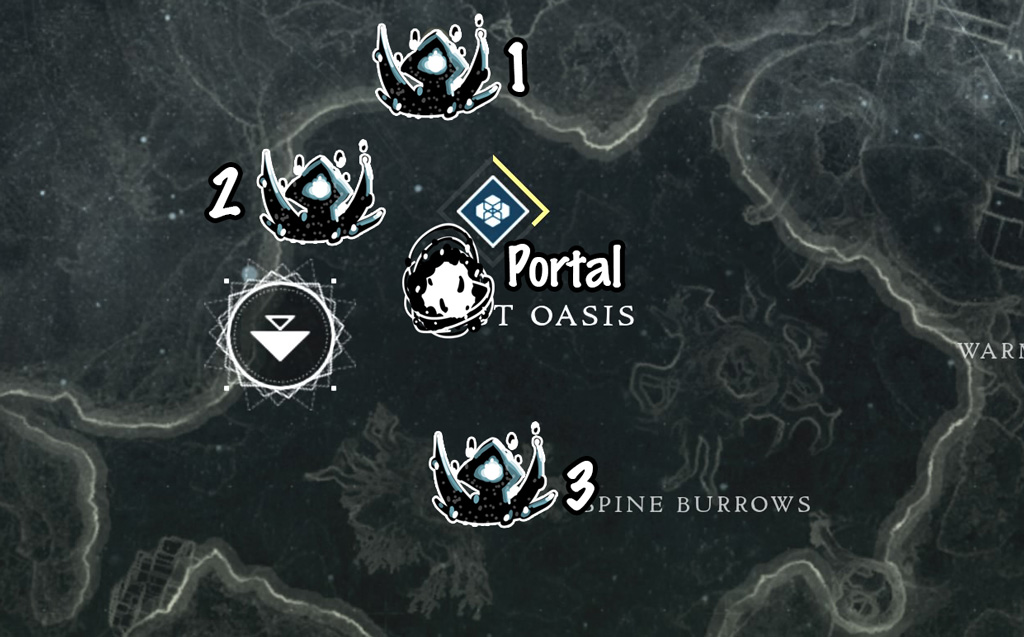
Note: It doesn’t matter who kills this Boss, don’t worry if you or a fellow Guardian doesn’t tag this guy.
Step 4: Through the Looking Glass
Alright, you’ve done the shittiest part of this which is the waiting. Now you’ve got to jump through the large white Taken portal that will spawn. Make sure that you have a full fireteam of 3 and that you are all ready. As soon as you all load into this area the countdown will start and you only have 20 minutes.
Step 5: I Hope You’re Good at Jumping
Okay, so this is the part of the guide I’ve been dreading ’cause it is just a bunch of meaningless descriptions that you won’t understand unless you’ve actually been in this area before. But who cares, this is good for SEO right? Here’s a video covering what to do before my funtime descriptions:
Alright, so as soon as you load in you have two options:
- Waste all your time and loop around the Lost Sector to the final spot.
- Get guud at jumping and jump to the ledge to your right to save 2-5 minutes.
Clearly, the right choice is to jump. To make this jump, as soon as you spawn in look to your right. There is a weird bone/shell looking pillar thing that is slightly taller than a Guardian. You’re gonna jump on this. Then, if you look slightly right you can see where the end of the normal Lost Sector is (chest and all), but if you look more to the right and above against the wall you can see a dark area with a ledge. You are trying to make that jump.
It will take you a few times to be able to do it, as I don’t think that jump is how Bungie intended you on doing it but again: WORTH IT.
Once you make the jump to the ledge (unless someone else already has) you will see a small Taken bubble. Shoot it and you’ll open up a hole in the floor to jump through.
Now the real challenge starts, JUMPY MCJUMPERSON.
Pro Tip: Equip your highest/longest jump for this ENTIRE thing. I don’t care how guud you are at the bonus thrust jump, if you haven’t practiced this stfu and equip the longest/highest jump. You will need all the forgiveness that you can get.
Pro Tip: Go slow, going slower and only jumping when you know you can make it is faster than dying over and over again trying to be quick. I promise.
Once you drop down, you’ll go through a spoopy cave and crouch under some Vex/Io debris. Then you come to your first Jump puzzle. Don’t worry, after you make each major jump you’ll get a new spawn point, this generally does not make you spawn very far back at all.
Make the first long jump and you’ll see a red room. Simply jump down against the wall and hit the ledge. The farther you can go on the ledge in your fall the better. You’ll crouch/slide under the wall and stop when you get out. Pay attention to the little bumpers that come out. This gets progressively harder. The first set of bumpers is pretty simple: Jump over them.
Once you get to the end of this ledge you’re gonna drop down all the way to the right. Now there are two sets of bumpers, ones at the bottom and ones at the top. If you’re tricky and made a far jump you may have made it halfway though these bumpers. Generally the top bumper and the bottom bumper alternate, so I suggest waiting for the bottom bumper to come out then hopping over it.
BAM, you did the first bumper puzzle. Reach the end of the ledge and hang a left, you’ve got some long jumps to make. The only time this is tricky is if you are a Titan, see: Titan’s have a momentum issue. If you are a Titan, make sure that you save a little boost at the end when you land on the pillar or you will continue your momentum and fall all.
Once you reach this pillar, look to your right and jump on the ledge. Follow the ledge left and around the corner. Slow down and you’ll see big blocks that slowly come out. You have plenty of time to make them individually, so just wait for the block to go in all the way then proceed. Do this 3 more times and you’ve reached the end of the pushy block part.
Now make another long jump, after the pushy block you’ll see another edge to your far left. Make that jump, and crouch under the sphere. Be careful, ’cause the ledge after the sphere is a slippery bastard and you’ll need to hop back up as soon as you clear crouching under the sphere.
Stand on the ledge and wait for the platform/elevator to come down. You’re gonna ride this all the way to the top and make a jump, watch out ’cause depending on how slow/fast you are there may be a bumper that pops out to your left just to screw with you.
Once you’ve made it to this ledge, walk forward then hang an immediate left into the space between the wall. You’ll walk up the ramp and hang a right and enter a weird hallway where the whole room is bumpers. Just hug the right side on the small platform and jump as often as you can. You’ll need to jump through the end hole as the curves make the physics real whacky and you can’t land on it.
Now you’ve made it to one of the hardest parts. This room is a set of ledges with the Taken Blight Boopers and occasional snipers.
Simply watch the Blight Boopers and right before it ‘splodes make your first jump. This will give you enough time to land on it right after it explodes. Keep doing this about 4 more times. Watch out and don’t go too slow ’cause the taken snipers will getcha.
When you get to the last ledge you’ll see across the way a sniper to the left and a weird door in the center. If you are cautious, take out the sniper. Watch the pattern of the door, again just like the Blight Boopers, start your jump right after it closes and you’ll be fine.
You’ll now enter a dark red room with a bunch of spheres gathered around and some portals. You’re goal is the farthest top right portal. So jump on the right ledge and walk all the way back and go down the portal.
BAM, walk a little far and you’re in the Green Room.
Don’t want to jump anymore? Me neither.
So walk slightly forward then turn around. Below where you walked in there are a few slabs leaning against the ledge and a black cave. Crouch and go in this cave. It’s a little tricky and you gotta keep walking till your ghost light turns on.
Make a quick jump across a gap and then walk out, you just skipped the whole green room.
Now you’ll see a large chasm area that you gotta follow a ledge around a column to your left. You will need to make a small hop jump before you reach the ledge which is portruding. Now that you’re on the portruding ledge look down and you’ll see a tiny door.
THIS IS THE GODDAMN HARDEST PART FOR TITANS.
Because of our momentum, we end up skating off the landing and down a platform.
Alright, so you gotta jump down to the doorway, but immediately after the doorway is a gap you have to jump over. So this means that if you are a Titan quickly tap your jump button on and off about 3/4s the way there, then when you are about to hit the edge tap your jump twice again to make a soft landing.
You done did it through the jumping puzzle. Once you jump over the gap and go through a spoopy red room you’re at the first room of adds. Hopefully you have about 12 minutes left.
This room isn’t that bad (especially on normal mode) and you just have to clear it. I suggest taking out the Knight to the left and the right first then clearing how you see fit.
Once you clear the first enemy room, hopefully you and your 2 other fireteam members have gotten caught up. You’ll shoot a Taken Blight blocking the door and go through a small cave with a few more enemies and then have a second enemy room.
This one is more difficult and I suggest hugging the right side and just going around counterclockwise. Once cleared you’ll shoot another taken blight. Make sure that you pick up all Special and Heavy ammo as you are about to fight the 3 bosses.
The next room is an open area with a big drop in a circle in the middle. You’ll have Taken Snipers to the top left and regular trash mobs to your right. Shortly after you walk in a Taken Cabal will spawn in behind your team so watch out. I suggest clearing this whole room ’cause sometimes the spawn is dumb and spawns you back in this room instead of the next room, plus you can get ammo.
Once you’ve cleared the chasm room, drop down the center hole and BAM you done got to the boss chamber.
But, before the bosses spawn you and your buddies gotta kill all the adds and Taken Blights around the room. I suggest splitting up, one guy go left to the Blights, one guy go right to the Blights, and the third covering the first two and killing adds.
After you’ve cleared the room, hopefully you have 5-7 minutes left’cause if you guys aren’t good at burning you’ll need that time.
Fall back to where dropped down to and pull out snipers. If you’ve got a Titan with you, pop a rally barricade and start shooting the bosses. Some people like to talk about the best “order” to kill them in, but whatever that doesn’t matter. Just make sure you team shot them. As long as you’re at the entrance you can kill whatever Taken Boss is poking his head out between the pillars.
Do this 3 times for all 3 bosses, and coordinate your supers. Make sure that if you are Titan Charging a boss that you let your team know, and if you are Hunter Lassoing some bitches you let your team know. That way you can coordinate the most damage.
Step 6: PROFIT

Whisper of the Worm Shirt
Whew, if you did all this shit you did it!
Damn, that was a lot of typing, and I bet most of you didn’t even read it. Gawd, what am I doing with my life? Hmm, probably the same thing as you’re about to be doing… Using the Whisper to pug sum scrubs in Gambit!
So what do I think about the Whisper, and is it worth it? Yes, I personally prefer it over Sleeper Stimulant, but that is all preference. I HATED Snipers in Destiny 2 until I got my hands on the Whisper of the Worm. For some reason, it just feels right. I’m not that good at proccing it’s “White Nail” Perc (which gives you ammo back and you don’t have to reload), but I am a Titan and Rally Barricade helps me out.
With this gun it is STILL some of the best DPS in the game for boss burn even after Destiny 2: Forsaken with all the new exotics. And, it can one shot Guardians in Gambit with a well placed headshot.
If you are running this in Gambit, you NEED to have Heavy Ammo finder and I highly suggest using Sniper Scavenger as this gives you more shots per crate. Practice those headshots and git guud.
0 Comments